
MySQLShell
Description Requirements Installation Configuration Usage Download
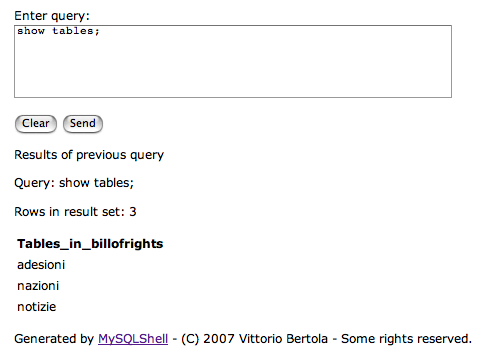
Screen sample (without CSS styling).
Current version
Version number: 1.0
Release date: 14/Feb/2007
Authors: Vittorio 'vb' Bertola
License: GNU GPL version 2
Interface language: English
Programming language: PHP
OS/Environment: Web
Description
MySQLShell is a simple PHP-based Web shell for managing remotely a MySQL server. It is designed as an equivalent of the mysql client program for those who have access to a remote MySQL instance, but do not have shell (SSH/Telnet) access to the server and so cannot use the mysql client program, and at the same time do not want to use more complex and heavy Web administration software such as PHPMyAdmin. It is also designed for simple integration into your PHP-based website.
MySQLShell provides you with a Web form where you can enter the same SQL commands that you would enter in the mysql client program, submit them to the server, and visualize their output. It is as simple as that; it provides you with no other functionality, nor helps you in any way. If you know PHP and SQL, it will take you ten minutes to have it up and running: that's its main purpose.
It is assumed that you know the SQL language and are familiar with administering a MySQL database using its command line shell (the interactive mode of the mysql client application). If you are not, then this software is possibly useless to you. If you are looking for a big, powerful and relatively user-friendly remote MySQL administration application, I suggest that you have a look at PHPMyAdmin instead.
Requirements
MySQLShell needs a web server supporting the PHP language (PHP 4 or higher, possibly). The PHP installation needs to include the standard "mysql" extension - usually, all installations do so by default. However, please note that the "mysql" extension is now supplemented by a newer "mysqli" extension; I have chosen to use the older one for extended backwards compatibility. In the future, you might need to specifically enable the older "mysql" extension.
Of course, you also need a MySQL server instance to connect to, with a username/password couple with appropriate privileges.
Installation
Download and extract the archive from this website. Copy the file f_mysqlshell.php onto your web server, to the directory corresponding to the URL where you will make the shell accessible.
Configuration
Creating a web page
To use MySQLShell, you have to create a web page in which the user interface will be embedded. You will then have to include two lines of code, in the point in the page where you want MySQLShell's user interface to appear; the first to include the program, and the second to execute it, as follows:
require('f_mysqlshell.php'); mysqlshell('connect_db.php');
The mysqlshell function is your only interface to the program - when called, it will cause the user interface of MySQLShell to appear in that point of the page. Of course, you can enclose the two lines above wherever you want in your page, to organize the layout. The only (optional) argument to mysqlshell is the path to the DB connection script (see next section).
See the sample page named mysqlshell.php, included in the archive, for a simple example. You can use that page out of the box, or use it as a starting point to design your own.
Database connection
To work, MySQLShell needs a working database connection. To allow for maximum flexibility, the program does not contain any code to make the connection; however, it allows you to specify the path to a PHP snippet that opens the connection.
In other words, you can write your own code to open a connection to the MySQL server, using the mysql_connect or mysql_pconnect functions of the "mysql" PHP extension, and put it in the page before you call mysqlshell; or, you can put it in a separate file and have mysqlshell call it for you, by providing its path as an argument to the function.
If you are unfamiliar with all of this, the simplest way to do this would be creating another PHP file in the same directory as the others, named connect_db.php, with the following content:
<?php $dbh = mysql_pconnect('server_hostname', 'username', 'password'); if (! $dbh) { echo "Database connection error: " . mysql_error(); exit; } mysql_select_db('database_name'); ?>
In the above code, you have to replace server_hostname, username, password and database_name with the corresponding information for your MySQL access and the database you want to manage (this last line is optional, you can always change and select databases from the shell with the USE SQL command). Of course, to use any MySQL shell you need a username and password with access to your server and database - refer to the MySQL manual for this.
If you do so, then all you have to do is to supply connect_db.php as argument to mysqlshell. If no argument is supplied, mysqlshell will assume that you managed to open a connection on your own, and will not do anything about that.
Security
Warning: Read this section carefully.
Once you set up this software, whoever has access to the Web page containing its interface will be able to mess up your database, up to completely deleting its content (depending on access privileges of the MySQL account you are using for the connection). It is thus very important that you ensure that only authorized users (you, possibly) are able to use it.
This can be accomplished in a number of different ways. If you are integrating MySQLShell into a bigger PHP-based website, chances are that you already developed an authentication system (for example, using the PHP session management) to build password-protected pages. Otherwise, if you have access to the web server configuration, you could put this software in a special directory and use HTTP Basic authentication to require a username and password (different from the MySQL ones) to gain access to it; see here for a tutorial on how to do it with the Apache web server software.
As a last resort, you could upload this software to the Web hosting account for the strict time necessary to use it, and then delete it...
Styling
As per the default, the output of the program will look very raw, with almost no layout. This has been done to allow you to apply styles and be able to customize completely the appearance (though not the substance) of the output.
All you have to do is to create a style sheet in CSS format, and link it in the header of the HTML page as usual for stylesheets. Then, use CSS attributes to change the appearance of the various elements of the output, following these class/ID names:
| CSS element | Controls |
|---|---|
| #mss_form | The DIV that contains the upper form where you enter the query. |
| #mss_query | The TEXTAREA where you enter the query. |
| .mss_buttons | The paragraph that contains the two buttons of the form ("Clear" and "Submit"). |
| .mss_restitle | The DIV with the title that says "Results of the previous query". |
| .mss_querytext | The text of the last query (the one whose results are shown in the lower part). |
| .mss_result | The paragraph that contains information on the result of the query (e.g. number of rows returned). |
| #mss_table | The table that contains the results of the query. |
| .mss_row | Each odd-numbered row of the result set (first, third...). |
| .mss_row_alt | Each even-numbered row of the result set (second, fourth...). |
| .mss_credits | The credits message at the bottom. |
Usage
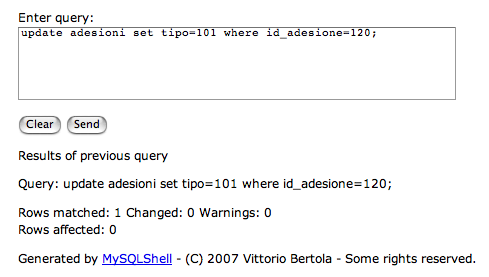
Screen sample for a result-set query.
The user interface for MySQLShell is composed of two parts - except if you didn't enter a query yet, in which case you only have the upper part.
In the upper part, you have a text area where you can type your query. After you do so, you can press the "Send" button to submit the query to the server (or "Clear" if you want to clean the text area to type a new query).
Once you submit the query, the page will reload, and in the lower part you will find the results. If your query is an update or insert, then you will find the report on the number of affected rows. If it is a select or an administration operation, you will find the count of rows found, and the result set displayed in a table below, with the names of the fields as column names. The query that you entered will be reported before the results, and will also be inserted in the text area so that you can use it as a base if you need to edit it before submitting it again.
Please be careful about how you use the "Back" and "Forward" buttons of your browser; if you reload the page corresponding to a query, that query will be submitted and executed again. If it is an update or insert operation, that might not be what you want.
Download
Click here to download:
MySQLShell 1.0 (7540 bytes)
